Holiday Paper Stars Tutorial
I'm so excited to have my good friend Pam visiting today with this fantastic paper star tutorial-just in time to add to your holiday decor! Pam shared this over at Mercantile Muse last year, and I asked her if I could share it with you.


Star Shine
I have to thank Cari-Jane from HyrbridHandmade for pinning an awesome paper star tutorial on pinterest. I love it and it looked so do-able, I tried it right away. Here's my own take on the tutorial that Cari-Jane pinned.
You'll need:
two pieces of square paper- you could use origami paper
(I used a 32 lb. printer paper)
scissors
glue
ruler
string, ribbon or twine
I printed off one of my illustration designs to use for my paper.

Then I trimmed it to 6 x 6 like the original tutorial, but you could use any square size.

Fold your paper in half.

Then fold in half the other way, so you now have folds on your paper like this.

Next step is to fold corner to corner.

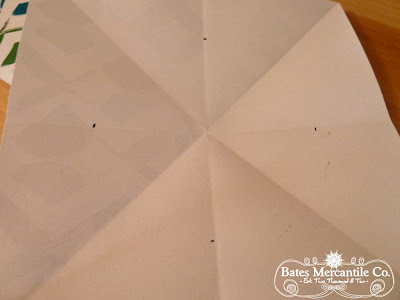
Again, now fold from other corner to corner so you fold lines now look like this.

On lines coming from sides (not corners), make a just shy of halfway. On my 6 x 6 square, I marked at 1.25.

Continue until each side is marked, like this.

Cut along line to each mark.

Once lines are cut, fold over to line coming from corner.

Do this all the way around until your paper looks like this.

Now glue one flap at each 'star' point, and pull other flap over and hold until glue is set.

Choose one point to insert twine in before completing all sides.

Complete rest of points.

You now should have a 3 dimesional star that looks like this on one side.........

........and this on the other.

Repeat this process, except for the twine, to make another star. Once you have two stars you are going to glue together. Place glue like this.

Gently press two stars together and hold in place until glue sets.

Wait 10 minutes before hanging to be sure glue is set enough.

Decorate with your new star as you see fit.
Hang a lone star or...................

.......hang in a grouping.

I think this is the perfect craft with the holidays coming up. I've adjusted my Chinese Lantern pattern an 8x8 size so most people can easily print it out on 8.5 x 11 paper to use for this project. I would have tried the 8x8, but was trying to follow original tutorial. I did use a little bit heaver 32 lb. paper, but you could certainly try it with regular copy pape. I think by the time the stars are folded and glued, it would have enough stability.
Click below and right click to save to your computer or copy and paste into a document.

I would have tried the 8x8 paper design, but was doing my best to follow original tutorial to a T. FYI- I did use a little bit heavier 32 lb. printer paper, but you could certainly try it with regular printer paper. I think by the time the stars are folded and glued, it would have enough stability.
What are you waiting for? Give it a try!
This week you get two back-to-back tutorials because tomorrow finds Stacey from A Sort Of Fairytale and Maggie Jane's Vintage taking on the Muse's Be Our Guest post and wait until you see the card-tags she's going to show us how to make. They're a ton of fun!
Here's wishing you a wonderful Monday. Start your week off with a bang.
Thanks, Pam!
Make sure you stop by and say hi to Pam!


Love this! Off to pin it now for future reference. Thanks for sharing.
ReplyDelete