Decoupage Canvases {DIY}.
The wall decor in my workroom has always bothered me. We hung up a lot of things in there to help fill the space, but I was never really happy with their placement. A few weeks ago, I went to town and took down a bunch of stuff, rearranging a lot of it and eliminating some things that were just not working. The wall my sewing machine table is on had a cork board, two large fabric hoops, and a wooden ironing board I found at the dump, which I planned to paint and then sort-of did but I ended up hating it. My degrees are on the side wall. And while there's nothing wrong with this wall, it always ending up bugging me.

In the basement we had stashed away 4 large 18" x 24" painting canvases that we had gotten for free. I measured, and knew they would be the perfect size to fill that wall. But with what? There was a neat tape/paint/canvas idea going around on Pinterest awhile ago and I almost did that when I remembered that I have a very large basket of fabric scraps that I could use, and since it is a sewing room, how neat would fabric look up on the wall? I gathered some supplies and got my decoupage on.

Now this makes me happy. It's so fun and bright and inviting. I moved the cork board to the side wall so I can still pin up ideas and useful things, and it fills in the space much better. The degrees came down, the hoops moved to another wall and the ironing board headed back to the dump. These canvases were so easy, I thought I'd share.

You'll need a painter's canvas (the wood-frame-backed kind), spray adhesive, Mod Podge, disposable brushes, and fabric scraps (maybe not quite such a full basket).

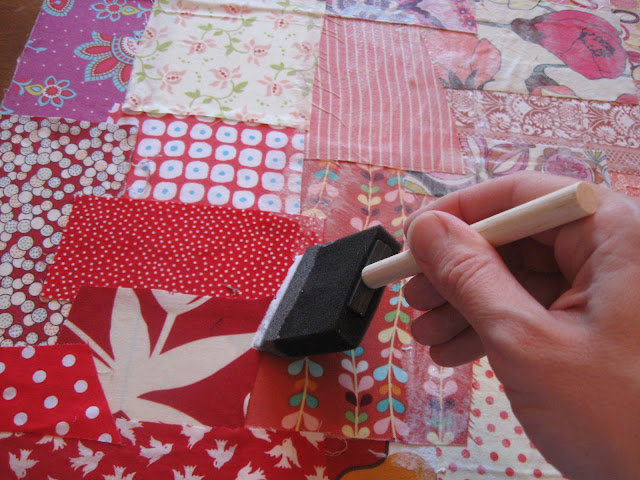
Spray the adhesive onto the canvas and press your fabric scraps into place in a patchwork pattern, making sure all the ends are nice and stuck down. I wanted to go for a rainbow effect and so I kept like colors together. I also cut strips and covered the four edges all in the same fabric so they looked more finished. Note: your fingers will get sticky.


Once the whole canvas is covered, let the adhesive dry completely. This was an outdoor project since the adhesive can be a little stinky.


When everything is dry, use a disposable brush to cover the entire surface with Mod Podge. I used the matte formula to help keep the flat look of the fabric. I wanted all the edges to stay flat and I didn't want anything peeling up.
Once the Mod Podge is completely dry, they're ready to hang.


Now when I walk in I get a little reminder of each project those fabrics were used on. It makes for a happy work space.

In the basement we had stashed away 4 large 18" x 24" painting canvases that we had gotten for free. I measured, and knew they would be the perfect size to fill that wall. But with what? There was a neat tape/paint/canvas idea going around on Pinterest awhile ago and I almost did that when I remembered that I have a very large basket of fabric scraps that I could use, and since it is a sewing room, how neat would fabric look up on the wall? I gathered some supplies and got my decoupage on.

Now this makes me happy. It's so fun and bright and inviting. I moved the cork board to the side wall so I can still pin up ideas and useful things, and it fills in the space much better. The degrees came down, the hoops moved to another wall and the ironing board headed back to the dump. These canvases were so easy, I thought I'd share.

You'll need a painter's canvas (the wood-frame-backed kind), spray adhesive, Mod Podge, disposable brushes, and fabric scraps (maybe not quite such a full basket).

Spray the adhesive onto the canvas and press your fabric scraps into place in a patchwork pattern, making sure all the ends are nice and stuck down. I wanted to go for a rainbow effect and so I kept like colors together. I also cut strips and covered the four edges all in the same fabric so they looked more finished. Note: your fingers will get sticky.


Once the whole canvas is covered, let the adhesive dry completely. This was an outdoor project since the adhesive can be a little stinky.


When everything is dry, use a disposable brush to cover the entire surface with Mod Podge. I used the matte formula to help keep the flat look of the fabric. I wanted all the edges to stay flat and I didn't want anything peeling up.

Once the Mod Podge is completely dry, they're ready to hang.


Now when I walk in I get a little reminder of each project those fabrics were used on. It makes for a happy work space.

SO Cute! What a sweet way to remember all your hard work :)
ReplyDeleteyess!! Thanks for sharing this. I literally have a bag of fabric that I don't know what to do with and this would be a great project to add some color to my work room.
ReplyDeleteLOVE decopage. it can also hide a multitude of ugliness.
ReplyDeleteso much color to make you happy!!!
Those are so fun! Perfect for your sewing room. I'm kind of impressed with the amount of scrap fabric you had, haha.
ReplyDeleteThis such a neat idea! I like that you are hanging them in your sewing room too-- perfect!
ReplyDeleteVery cool! It would be a great way to use a charm pack.
ReplyDeletehttps://bayanlarsitesi.com/
ReplyDeleteAltınşehir
Karaköy
Alemdağ
Gürpınar
HGZ
görüntülü.show
ReplyDeletewhatsapp ücretli show
3Y3V
https://titandijital.com.tr/
ReplyDeletekars parça eşya taşıma
konya parça eşya taşıma
çankırı parça eşya taşıma
yalova parça eşya taşıma
1MJL4
ankara parça eşya taşıma
ReplyDeletetakipçi satın al
antalya rent a car
antalya rent a car
ankara parça eşya taşıma
YDİSN
Bolu Lojistik
ReplyDeleteMardin Lojistik
Kocaeli Lojistik
Diyarbakır Lojistik
İstanbul Lojistik
KTMCY
kayseri evden eve nakliyat
ReplyDeletesamsun evden eve nakliyat
muğla evden eve nakliyat
bursa evden eve nakliyat
bingöl evden eve nakliyat
E21
5CDE4
ReplyDeleteAfyon Lojistik
Siirt Lojistik
Erzincan Parça Eşya Taşıma
Muş Parça Eşya Taşıma
Isparta Parça Eşya Taşıma
19F56
ReplyDeleteRize Şehirler Arası Nakliyat
Bayburt Lojistik
Etlik Boya Ustası
Tunceli Parça Eşya Taşıma
Malatya Şehirler Arası Nakliyat
Tekirdağ Parke Ustası
Yenimahalle Parke Ustası
Karabük Parça Eşya Taşıma
Çorlu Lojistik
E4A60
ReplyDeleteÜnye Yol Yardım
Ünye Televizyon Tamircisi
Ünye Oto Elektrik
Çorum Şehir İçi Nakliyat
Muş Evden Eve Nakliyat
Kayseri Şehir İçi Nakliyat
Ankara Asansör Tamiri
Bursa Lojistik
Raca Coin Hangi Borsada
409BC
ReplyDeleteParibu Güvenilir mi
Hakkari Şehir İçi Nakliyat
Erzincan Şehir İçi Nakliyat
Keep Coin Hangi Borsada
Yobit Güvenilir mi
Aksaray Parça Eşya Taşıma
Antep Evden Eve Nakliyat
Btcturk Güvenilir mi
Mersin Parça Eşya Taşıma
2872C
ReplyDeletereferanskodunedir.com.tr
C9A70
ReplyDeletetekirdağ canlı görüntülü sohbet
maraş yabancı sohbet
kayseri ücretsiz sohbet siteleri
eskişehir seslı sohbet sıtelerı
osmaniye yabancı görüntülü sohbet
konya canli sohbet bedava
denizli canlı görüntülü sohbet siteleri
amasya görüntülü sohbet kızlarla
kayseri mobil sohbet et
D3CD4
ReplyDeleteRize En İyi Görüntülü Sohbet Uygulamaları
rastgele sohbet
antep görüntülü sohbet
Ardahan Rastgele Sohbet
tekirdağ canlı sohbet siteleri
maraş sohbet uygulamaları
en iyi ücretsiz sohbet uygulamaları
ardahan rastgele canlı sohbet
Urfa Parasız Görüntülü Sohbet Uygulamaları
383B6
ReplyDeletekadınlarla ücretsiz sohbet
Nevşehir Rastgele Görüntülü Sohbet
çorum bedava sohbet siteleri
canlı sohbet et
gümüşhane sohbet uygulamaları
nevşehir en iyi ücretsiz sohbet siteleri
bedava sohbet odaları
yalova rastgele görüntülü sohbet ücretsiz
bayburt telefonda rastgele sohbet
15766
ReplyDeleteBingöl Telefonda Kadınlarla Sohbet
ankara görüntülü sohbet uygulama
hakkari telefonda görüntülü sohbet
görüntülü sohbet ücretsiz
telefonda kadınlarla sohbet
Tekirdağ Yabancı Sohbet
Afyon Canlı Sohbet Ücretsiz
urfa sohbet sitesi
siirt parasız görüntülü sohbet uygulamaları
4C6E6
ReplyDeleteÇankırı En İyi Rastgele Görüntülü Sohbet
ankara mobil sohbet
chat sohbet
Denizli Sohbet
bursa canlı görüntülü sohbet siteleri
kadınlarla sohbet
bayburt rastgele sohbet
Hakkari Kadınlarla Görüntülü Sohbet
Adana Bedava Sohbet Chat Odaları
E6E28
ReplyDeleteLikee App Beğeni Satın Al
Kripto Para Nasıl Üretilir
Bitcoin Kazanma
Binance Hangi Ülkenin
Bitcoin Nasıl Para Kazanılır
Coin Nasıl Üretilir
Baby Doge Coin Hangi Borsada
Kripto Para Kazanma Siteleri
Clubhouse Takipçi Satın Al
317A3
ReplyDeleteTiktok İzlenme Satın Al
Onlyfans Takipçi Satın Al
Luffy Coin Hangi Borsada
Tesla Coin Hangi Borsada
Ceek Coin Hangi Borsada
Coin Nasıl Çıkarılır
Kripto Para Nasıl Üretilir
Alya Coin Hangi Borsada
Parasız Görüntülü Sohbet
1AE80
ReplyDeleteLovely Coin Hangi Borsada
Likee App Takipçi Hilesi
Telegram Abone Hilesi
Soundcloud Takipçi Hilesi
Bitcoin Kazma
Gate io Borsası Güvenilir mi
Arg Coin Hangi Borsada
Binance Referans Kodu
Parasız Görüntülü Sohbet
3BD99
ReplyDeletelayerzero
chainlist
ledger desktop
roninchain
metamask
looksrare
poocoin
safepal
sushi
969AC
ReplyDeleteuwu lend
sushi
ledger live
satoshi
poocoin
poocoin
chainlist
safepal
arbitrum
1EEBF806B4
ReplyDeleteinstagram ucuz takipçi
1F6437445F
ReplyDeleteAnadoluslot Güncel Giriş Adresi
Anadoluslot
Anadoluslot Giriş
Anadoluslot Giriş Adresi
Trwin Güncel Giriş Adresi
Trwin
Trwin
Trwin
Trwin Giriş
02DA215DE2
ReplyDeleteAnadoluslot
Anadoluslot Yeni Adres
Anadoluslot Yeni Adres
Anadoluslot
Trwin
Trwin Yeni Adres
Trwin
Trwin Güncel Giriş Adresi
Trwin