What We Made: Jar Shelf
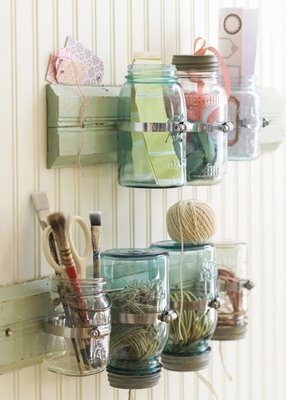
A long, long time ago, I saw this on Pinterest:


When I went back to find it, I realized I never pinned it, so I had to find it again. Don't you hate when that happens?
Anyway, I've been collecting jars to hold things in my crafty work room. Not Mason jars- Stonewall Kitchen Black Bean Salsa jars. On just about every occasion, the hubs is gifted a jar or two of this yummy but pricey salsa, and the jars are a great size for small storage, so I've kept them and had put various things in a few. But, they were on top of the work table and that takes up space, so when I saw this photo, I knew I wanted to do something similar.
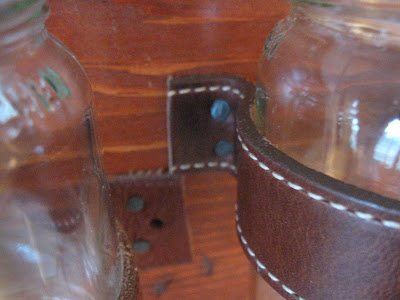
Enter the hubs. Have I told you how brilliant and wonderful he is? I told him my idea, but since I didn't have the photo, I had to explain it to him. "It's a wooden backer with the jars held on to it by metal clamps. Can I get those at Home Depot?" Something along those lines. So on one of our various trips to HD I looked for said clamps. Not those in the picture but something I had apparently made up entirely in my head because we could not find them. We did find those hose clamps like in the photo, but hubs was like, "You want to use hose clamps on something in your craft room?" AKA don't use that crap. Then he says, "You should get something like an old leather strap and strap the jars down tight so they don't slide." "Why, yes, honey, that would be great, but where will I find an old leather strap that doesn't cost a fortune?"
*Light bulb goes on.*
Savers! Let's go to Savers and look at the belts!!!!!
Have I mentioned that I love Savers? These were both soft, lovely leather belts. Perfect for my project. (We got something else fun too, but that's for another day.) So two belts, a box of black carpet tacks, and 6 salsa jars later:
Ok, so maybe there was a little more to it than that. Some sanding, staining, lacquering, ribbon-holder-making, squealing, hugging, jumping up and down...you get the picture.
Isn't he amazing? Isn't this the best shelf you ever saw? Once I got the idea out and realized how much it would help to get the jars off the work table, I figured it would be great to get all the ribbon off of it, too, since it was all stacked up against the wall. I proposed this idea to hubs (with a dowel in hand) and he made it. I love how it looks- the belts and the carpet tacks were a great idea. Old-fashioned style but not quite rustic. It's so nice to have all that stuff off the tabletop. I would post a tutorial for you, but I think you can figure out how it goes together.
Anyone been making something fun lately? Chop up something you found at Savers? Goaded your husband into a project? Do tell!


So many things about this project are awesome: Savers, that pin, and using old belts! Did you guys make the ribbon caddy on the bottom, too, or was that already there?
ReplyDeleteI recruited the Hubs to carry the box for my new Hemnes dresser up 3 flights of stairs. Our building doesn't have an elevator and I can only drag an 80 lb. box so far.
He made it! I have no idea how. Now I just have to get used to reaching up for my tools. And yea, the Ikea stuff is great until you have to lift the boxes.
DeleteOh my goodness -- I love this! I have a similar picture pinned too, but I love the belts instead of the metal clamps! I recently reorganized my craft room as well and Handy Andy built me a huge floor-to-ceiling shelf in like 2 hours to hold all my stuff. I love when they help out!
ReplyDeleteDon't forget to link this up to my linky this week! :)
Yes, in that case I'm perfectly happy to let him take over LOL! Are you going to share the shelf??
DeleteLOVE this! What inspiration as I begin thinking about storage ideas for my studio. I'm at a standstill right now, transferring items from the basement to my studio because I don't have many storage options. Andrew could totally build something like this for me!
ReplyDeleteI got a 2 x 4 cube Expedit from Ikea, too, and that will help quite a bit, and since it's white, it's great to use as a photography base, too!
DeleteThat is SO cute! Y'all did a great job - I think I like your version better than the original on Pinterest. Funny, too - I pinned the exact same photo a few weeks ago! :)
ReplyDeleteThank you! I love that photo, but I am super happy with what we did and I do like it better. It's more functional for me!
DeleteThat is really awesome! Your husband is so talented.
ReplyDeletelove yours WAY more than the original! way to go you two!
ReplyDeleteOMG!!! I am totally doing this!!!! I love how it turned out! P.S. Savers is fanfrigentastic. Nice job
ReplyDeleteWow that's looks great!
ReplyDeleteVery nice!!!
ReplyDeleteThat is great! I love how you used the belts!!!
ReplyDeleteI love the belts! What a great idea - fantastic!
ReplyDeletefabulous, k! I love that you took the time to save everything and figure out the best way to "make it work!"!!! I love how it turned out, just boooooteeeefull!
ReplyDelete-rachel w k
rwkrafts.blogspot.com
The belts are a wonderful idea and take on your inspiration piece! And how wonderful that your husband was able to help you.
ReplyDeleteI hope you can stop by and share with our link party.
Artful Rising
Erika
This is so cute.
ReplyDeleteTranae
www.becomingfab.com
I actually like yours better!! SOOOO creative!
ReplyDeleteRecently started following via Google Reader. LOVE the leather goodness of the belts much better that the metal. Great job!
ReplyDeleteWow, that was a stroke of brilliance you both had with the belts!! I want one for my own craft room!!
ReplyDeleteThanks so much for linking this up last Thursday!! I'll be featuring you later today!!
LOVE this!!! :D This is great! I want one now!!!
ReplyDeleteHave a wonderful day!
Marilyn
Brilliant!
ReplyDeleteKristen this is fantastic. I literally just got back from the junk store, and passed up some leather belts. I may need to go back now!
ReplyDelete